
Control deck configuration
Unfortunately, the configuration utilities for the Ultimarc MUC are Windows-based. I downloaded and used the following software:
I normally use VMWare Fusion under macOS, which supports USB passthrough. To my surprise (and probably because the Ultimarc MUC shows up as a keyboard due to USB-HID) it wouldn’t pass over to a Windows Virtual Machine. VirtualBox on the other hand passed it through just fine, and I was able to make configuration changes (and test LEDs).
Do you want to save yourself some time, and not have to enter all of these manually?
- Download the WinIPAC V2 configuration file from the Teenage Mutant Ninja Terminals Git repository.
- Run WinIPAC V2.
- Menu: File → Import.
- Menu: File → Force board reconfigure.
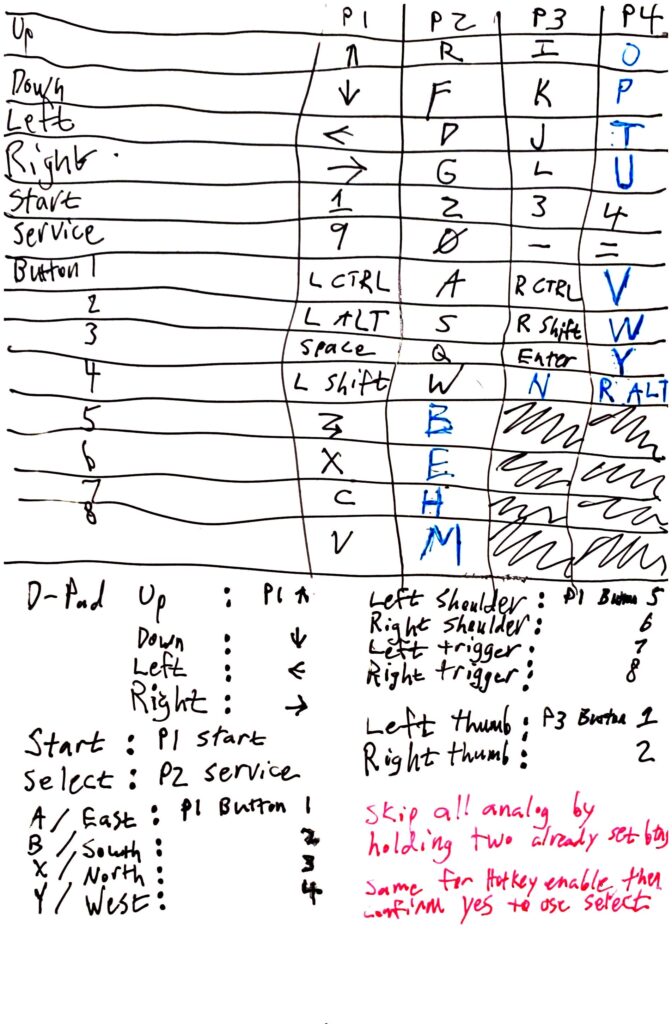
At the time of writing this article, I have 52 inputs on my machine: 4 via GPIO for coin inserts, and 48 via the Ultimarc MUC as an encoder that presents itself as a keyboard. After sifting through MAME’s input source code, I’ve set the controller mappings as follows:
Player 1 (Leonardo)
| Function | Keyboard Mapping | Hardware location |
|---|---|---|
| Up | Up arrow | Ultimarc — 1UP |
| Down | Down arrow | Ultimarc — 1DOWN |
| Left | Left arrow | Ultimarc — 1LEFT |
| Right | Right arrow | Ultimarc — 1RIGHT |
| Start | 1 | Ultimarc — 1START |
| Service | 9 | Ultimarc — 1COIN |
| Coin | 5 | Raspberry Pi — GPIO 26 |
| Button 1 | Left control | Ultimarc — 1SW1 |
| Button 2 | Left alt | Ultimarc — 1SW2 |
| Button 3 | Space bar | Ultimarc — 1SW3 |
| Button 4 | Left shift | Ultimarc — 1SW4 |
| Button 5 | Z | Ultimarc — 1SW5 |
| Button 6 | X | Ultimarc — 1SW6 |
| Button 7 | C | Ultimarc — 1SW7 |
| Button 8 | V | Ultimarc — 1SW8 |
| Function | Keyboard Mapping | Hardware location |
Player 2 (Michelangelo)
| Function | Keyboard Mapping | Hardware location |
|---|---|---|
| Up | R | Ultimarc — 2UP |
| Down | F | Ultimarc — 2DOWN |
| Left | D | Ultimarc — 2LEFT |
| Right | G | Ultimarc — 2RIGHT |
| Start | 2 | Ultimarc — 2START |
| Service | 0 | Ultimarc — 2COIN |
| Coin | 6 | Raspberry Pi — GPIO 19 |
| Button 1 | A | Ultimarc — 2SW1 |
| Button 2 | S | Ultimarc — 2SW2 |
| Button 3 | Q | Ultimarc — 2SW3 |
| Button 4 | W | Ultimarc — 2SW4 |
| Button 5 | B | Ultimarc — 2SW5 |
| Button 6 | E | Ultimarc — 2SW6 |
| Button 7 | H | Ultimarc — 2SW7 |
| Button 8 | M | Ultimarc — 2SW8 |
| Function | Keyboard Mapping | Hardware location |
Player 3 (Donatello)
| Function | Keyboard Mapping | Hardware location |
|---|---|---|
| Up | I | Ultimarc — PLAYER3 : UP |
| Down | K | Ultimarc — PLAYER3 : DN |
| Left | J | Ultimarc — PLAYER3 : LF |
| Right | L | Ultimarc — PLAYER3 : RT |
| Start | 3 | Ultimarc — Player 1 & 2 Harness : 1A |
| Service | - | Ultimarc — Player 1 & 2 Harness : 1B |
| Coin | 7 | Raspberry Pi — GPIO 13 |
| Button 1 | Right control | Ultimarc — PLAYER3 : S1 |
| Button 2 | Right shift | Ultimarc — PLAYER3 : S2 |
| Button 3 | Enter | Ultimarc — PLAYER3 : S3 |
| Button 4 | N | Ultimarc — PLAYER3 : S4 |
| Function | Keyboard Mapping | Hardware location |
Player 4 (Raphael)
| Function | Keyboard Mapping | Hardware location |
|---|---|---|
| Up | O | Ultimarc — PLAYER4 : UP |
| Down | P | Ultimarc — PLAYER4 : DN |
| Left | T | Ultimarc — PLAYER4 : LF |
| Right | U | Ultimarc — PLAYER4 : RT |
| Start | 4 | Ultimarc — Player 1 & 2 Harness : 2A |
| Service | = | Ultimarc — Player 1 & 2 Harness : 2B |
| Coin | 8 | Raspberry Pi — GPIO 6 |
| Button 1 | V | Ultimarc — PLAYER4 : S1 |
| Button 2 | W | Ultimarc — PLAYER4 : S2 |
| Button 3 | Y | Ultimarc — PLAYER4 : S3 |
| Button 4 | Right alt | Ultimarc — PLAYER4 : S4 |
| Function | Keyboard Mapping | Hardware location |
In the video above, I mentioned “Shift Keys”. What this means is that when one button is held down (by default 1START) and another button is pressed (e.g. 1COIN) then an alternate key would be sent.
Example: I switched over to AdvanceMAME for running arcade ROMs. In order to exit the emulator since it’s not a part of Libretro, I needed the Escape key to be sent to it when I press the Start and Coin buttons on Player 1. So, the Shifted key for 1COIN on the Ultimarc MUC is set to Escape.
Shift keys
| Function | Keyboard Mapping / Shifted Key | Hardware location |
|---|---|---|
| Exit emulator | Escape key | Ultimarc — 1COIN |
| Service mode | F2 | Ultimarc — 2COIN |
As you run ROMs (and speaking from the perspective of MAME), you can adjust the global input values or the local input values by hitting the tab button on the keyboard. I set all of my controls at the global level, and then tweak each game’s inputs if the inputs aren’t entirely accurate. Smash TV is one such example, where I configured this 4-player control deck for the dual-joystick control of the game.
If you’re using MAME 2003 (RetroPie’s default) and if you ever want to delete the settings and start over, they’re located in /home/pi/RetroPie/roms/arcade/mame2003/cfg. The global values are stored as default.cfg, while as everything else is named after each of the ROMs that you run (with those values initially set from the global values the first time that you start them). That said, if you’re using AdvanceMAME, everything is stored in a flat-file that’s located at /opt/retropie/configs/mame-advmame/advmame.rc.